
Using Animation, Virtual Worlds, Pair Programming and Activities to Introduce Computer Science
Susan
H. Rodger, Duke University
Abstract
We describe a
course for non-majors that teaches computer science concepts using both noncomputer
activities and pair programming on the computer during class to build simple
animations and virtual worlds. Students work with a scripting language, an interactive
programming environment, a programmable modeling environment, and finish with
a simple programming language. Noncomputer activities on related topics are
integrated into lectures. The course is taught in a room that is designed for
working on computers in pairs and discussing away from the computers. Each student
creates a web portfolio to display their work.
1. Introduction
All college students
use the World Wide Web, but few know what computer science is. We have developed
the non-majors course CPS 49S [6] Animation and Virtual Worlds at Duke University
to teach students computer science concepts and programming through a combination
of noncomputer activities and computer programming of simple 2D and 3D worlds.
Since many beginning programming courses can be frustrating and intimidating
to students, we use pair programming [16] during class. Studies [5] show that
students who program in pairs in introductory courses produce better programs
and complete the course at a higher rate.
Students work with many computer languages in this course. The first language students learn is HTML so that they can create a web portfolio of their work in the course. This is followed by a scripting language to build simple animations, a programmable modeling environment to create 2D worlds of decentralized systems, and an interactive programming environment to build 3D worlds in which they control the appearance and movement of objects. Finally, they finish with a simple object-oriented programming language to move robots in a 2D world. During the course, computer science concepts are introduced with relation to the animation and virtual worlds. Several of the topics have a non-computer activity to introduce them.
Being a non-majors course,
the course targets students with no experience and no interest in majoring in
computer science. This type of student may be more hesitant to learn programming.
Because programming is presented in a visual and animated way, students found
programming fun. To limit frustration, the course is
taught in a room with computers. During class students work on these computers
in pairs, receiving assistance from the instructor and teaching assistants.
2. Overview of the Course:
CPS 49S
2.1 The Students
Freshmen in the College of Arts and Sciences at Duke University must take
a special topics seminar their first year, a chance to pursue a special topic
in some depth with 15 or fewer students. In 2001 CPS 49S was developed as one
of these seminars in conjunction with Project Advance, an interdisciplinary
program at Duke University for women interested in mathematics, computer science
and statistics. Our course was offered as one of three options for Advance students.
After Advance students signed up, other students could sign up for the course.
In the spring of 2001, the course had twelve women and three men. Because of
Project Advance, this course clearly had a strong ratio in favor of women. This
course will be offered again in the fall of 2002 not in conjunction with Project
Advance and currently has twelve men and three women registered, which corresponds
more inline with the ratios of men to women in computer science courses nationwide.
2.2 The Classroom
and Format
The classroom used for this course is called the Interactive Computer Classroom
(ICC) and is designed for teaching with students working in pairs on computers.
Figure 1 shows a layout of the ICC with large rectangles representing tables,
small rectangles representing computers and circles representing chairs. This
classroom has 25 tables for students. Twenty of the tables each have a computer
and two chairs. The remaining five tables are movable tables with no chairs
that are useful for design work or noncomputer activities. Chairs have wheels
so they are easily moveable to the work tables. The tables with the computers
are arranged in a U-shape around the sides and back of the room so that all
screens can be seen by the instructor from the front of the room. The instructor
has a computer in the front of the room (the table turned diagonally with just
one chair) and can project his or her screen or any student's screen to the
front of the room. Students face the front of the room for discussions and turn
around facing the back or sides of the room to work on the computer.
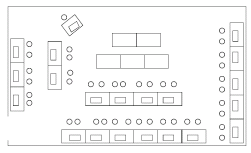
Figure 1. Interactive Computer Classroom.
The ICC is designed for 40 students maximum working in pairs, or 20 students working alone. At Duke this classroom is used by a number of disciplines including computer science, economics, mathematics, physics, biology, statistics, writing, sociology, history, and philosophy. In our CS 1 course we fill the room with 40 students. In CPS 49S, the room is clearly larger than we need, but we still work in pairs and the room works quite nicely.
CPS 49S uses the ICC in a workshop format. The instructor gives a short ten to fifteen minute lecture at the beginning of class to introduce the topic, then students turn around and work on the computer during most of the class. The instructor easily observes when people are having trouble and can get everyone to turn back around during class for a short discussion or at the end of class for a wrapup. During class students work in pairs most of the time, but a few noncomputer activities use groups of size 4. All pairs and groups are randomly assigned and change every few weeks. Outside of class students work on additional assignments individually.
Pair programming is used for all of the programming during class. One student is the driver who types, and the other student is the navigator who questions the driver and looks for mistakes. Class meets twice a week and students switch responsibilities with each new class period, driving one day and navigating the next class period.
CPS 49S was offered during the spring of 2001 as a regular semester course. We met two days a week for 14 weeks, 75 minutes each class period. The longer class period is helpful when students are engrossed in solving a problem.
2.3 The Syllabus
The syllabus for the course consists of five noncomputer activities integrated
with five programming units. The course begins with two noncomputer activities,
learning the importance of working together through a team building activity,
and learning about the preciseness of computers through an algorithm activity.
The first programming unit involves learning how to build web pages and starting
a web portfolio. This is followed by another noncomputer activity on sorting,
a fundamental concept studied in many computer science courses. In the next
programming unit simple animations are created using a tool JAWAA, including
a sorting animation. A noncomputer activity introduces decentralized systems,
a system in which there are many objects but no organizer. The next programming
unit then uses a tool StarLogo to create 2D simulations of decentralized worlds.
In the next programming unit simulations of 3D worlds are created using a tool
Alice in which one can control the appearance and movement of objects. Finally,
a noncomputer activity introduces the complexity of moving robots and in the
last programming unit the tool Karel++ is used to create 2D worlds of robots
in which one can control the robot's behavior and movement.
3. Topics in the Course
In this section we describe the topics in the course and the length of time
spent on each topic. All the noncomputer activities are done in one class period
or part of one class period. Several class periods are spent on each programming
unit.
3.1 Noncomputer Activity:
Importance of Pairing
In this noncomputer activity [15] students are divided into groups of four
and work on designing three simple transportation devices. However, the students
working different settings for each design, first alone, then as a group that
does not work together, and finally as
a group that does work together using pair rotation. In the first design students
work alone and then later compare their designs afterwards, which usually will
be quite different. With the second design, the students work as a group, but
they each work alone on a different part of the design, and then meet and put
it all together. In the last design students work as a group using pair rotation.
Two at a time work on a different aspect of the device, and then rotate. This
activity illustrates the advantages of working in pairs instead of alone.
3.2 Noncomputer
Activity: Designing an Algorithm
This activity shows
the difficulty in specifying precise details of an algorithm. First students
write an algorithm detailing how to make a peanut butter and jelly sandwich,
given a loaf of bread, a jar of peanut butter, a jar of jelly and a knife. Then
the instructor takes some of the algorithms and tries to follow the instructions
to make a peanut butter and jelly sandwich. Usually the students leave off something
obvious, such as taking the top off of a jar, leading to a hilarious effort
by the instructor.
3.3 Programming:
HTML and Web Portfolio
In the first programming unit of the course for one and a half weeks, students
learn HTML and create several simple web pages. Initially they are given a template
web page and they have to learn how to setup the web page and fill in some of
the blanks with text. Later they go through two HTML tutorials and create web
pages about an animal of their choice. These web pages have certain requirements
including a picture of the animal, ordered lists, unordered lists, definition
lists, tables and links.
Students continue making web pages throughout the course, making a web portfolio with all their work from the course. Many of the works are textual descriptions and pictures, and some are animations.
3.4 Noncomputer
Activity: Sorting
We spend one day with students investigating sorting as a noncomputer activity.
Students are assigned groups of size four, and each group gets an envelope with
over 100 big words, each word on a separate strip of paper. The first part is
to sort the words in alphabetical order and arrange them so they can answer
questions about the words. The second part is to write an algorithm describing
the method they use to sort their words. Finally, the third part is to answer
11 questions about the words including "How many words begin with the letter
'm'?" and "What is the 100th word?" The answers to all parts
are put on a web page.
This assignment is also given in Duke's CS 1 course. It is interesting to observe the groups developing sorting algorithms. We see students develop forms of insertion sort, bucket sort, mergesort and selection sort.
3.5 Programming:
Animation with JAWAA
JAWAA [9, 10] is a tool for creating animations easily over the web. With JAWAA
one can create simple primitives such as circles, ovals, rectangles, lines,
polygons and text, and move them around singly or in a group. One can enter
JAWAA commands in a file,
modify a simple HTML file, and easily generate an animation that runs on a web
page. JAWAA's main intent is for one to add JAWAA commands as output from a
program to animate a part of the program. In this course, we have not done any
programming yet, so instead students type JAWAA commands into a file to create
the animation instead of having them automatically generated. This unit is for
one and a half weeks. The first classwork consists of two animations. The first
animation is to experiment with JAWAA and requires each pair of students to
create several simple objects, move the objects, group some of the objects,
and move the group. The second animation gives the groups some freedom in the
topic, but has several requirements such as one of each primitive type, some
object that moves as a whole and has parts that move separately, and a color
change of an object. For example, one group created a pig that wiggles its nose
and then its behind as shown in Figure 2.
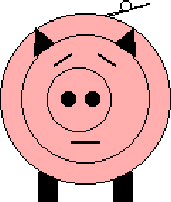
Figure 2. JAWAA Pig.
![]() An external link to the JAWAA Pig animation.
An external link to the JAWAA Pig animation.
The second classwork is a traffic simulation. Requirements include showing parts of two roads that intersect, a traffic light that cycles through red, green and yellow lights, cars that obey traffic lights, and a car crash with parts of the car flying off. Figure 3 shows a student traffic animation.
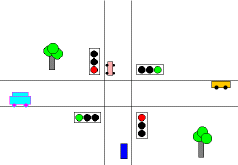
Figure 3. JAWAA Traffic Animation.
![]() An external link to the JAWAA Traffic animation.
An external link to the JAWAA Traffic animation.
The third classwork is a
sorting assignment. An animation has been started for them that creates 10 upright
skinny rectangles of different heights shown not ordered by height. Their task
is to come up with an algorithm for sorting the rectangles based on their height
and complete the animation using their algorithm. We have not talked about any
specific sorting algorithm in this class. All the groups create either selection
sort (starting with
smallest or largest) or insertion sort. Figure 4 shows a snapshot of a student
sorting animation that is selection sort by the largest.
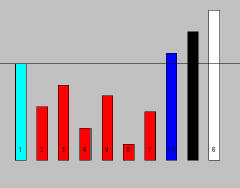
Figure 4. JAWAA Sorting Animation.
![]() An external link to the JAWAA Sort animation.
An external link to the JAWAA Sort animation.
Students finish JAWAA with a project of their choice. Figure 5 shows a student project of a cat trying to figure out how to get the fish in an aquarium. Figure 6 shows a student project of the birth and death of a flower. Figure 7 shows part of a basketball game complete with instant replays.
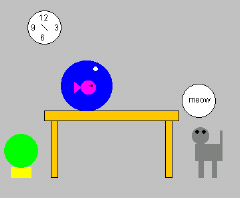
Figure 5. JAWAA Cat and Fish Animation.
![]() An external link to the JAWAA Cat and Fish animation.
An external link to the JAWAA Cat and Fish animation.
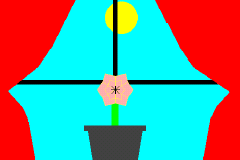
Figure 6. JAWAA Flower Animation.
![]() An external link to the JAWAA Flower animation.
An external link to the JAWAA Flower animation.
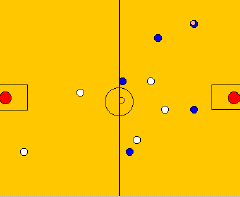
Figure 7. JAWAA Basketball Animation.
![]() An external link to the JAWAA Basketball animation.
An external link to the JAWAA Basketball animation.
3.6 Noncomputer
Activity: Decentralized Systems
The book [14] describes StarLogo and modeling in three parts. The first part
describes StarLogo, the second part integrates in a series of noncomputer activities
and challenges with StarLogo, and the third part has student handouts to go
along with the challenges. Many of the activities here would go well either
as an introduction into the next unit with StarLogo or as activities along with
StarLogo; however in this course there is not time to do all of them. We explain
two of the activities to introduce the concept of a decentralized system. In
a decentralized system, there is no organizer, but rather many beings all following
the same instructions. The first activity shows how orderly patterns can arise.
Everyone in the class is to raise and lower their hand repeatedly until they
are all doing it at the same time. Discussion follows on what cues people use
to get the hands in sync without an organizer. The second activity illustrates
the concept of the survival of the fittest. Everyone crumples up a piece of
paper and one person comes to the front and repeatedly does the following. The
person throws their paper in the air and if they catch it, then selects one
person from the audience to come join them. If they do not catch it they must
sit down. This can result in the death of a species if all the paper catchers
drop their paper, or a full society if everyone in the room is selected and
is not dropping their paper.
3.7 Programming:
StarLogo
We spend three and half weeks on StarLogo [11, 13] from the MIT Media Lab. StarLogo
is a programmable modeling environment for exploring decentralized systems,
systems that are organized without an organizer. StarLogo is an extension of
Logo. In Logo one can create and control one turtle, and in StarLogo one can
create thousands of turtles that move in parallel. To create a StarLogo project,
one enters control commands in one window and creates graphical buttons and
sliders in a window where the simulation will be viewed.
In the first week, students learn StarLogo through a tutorial from the Starlogo web site and create a termite and wood chip world in which termites pick up and move wood chips. Each wood chip is represented by a yellow square and each termite is represented by a red square. Each termite randomly moves picking up a wood chip and carrying it until it bumps into another wood chip and then puts its wood chip down in a nearby empty space. Eventually, all the wood chips end up in a single pile.
In the second week, students create a traffic simulation that has similar requirements to the JAWAA traffic assignment, but using Starlogo instead. Figure 8 shows a student Starlogo traffic project and Figure 9 shows the corresponding buttons the students created to control the project.
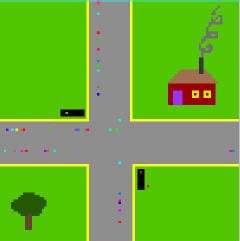
Figure 8. StarLogo Traffic project.
![]() Starlogo Traffic project.
Starlogo Traffic project.
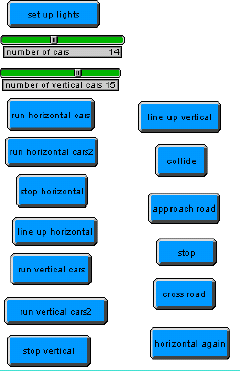
Figure 9. StarLogo Traffic Buttons.
The StarLogo procedure shown below from the students' project shows how to set up the lights for the two traffic lights (turtles numbered 0 through 5) and how to set up and move some of the horizontal cars which are turtles numbered starting at 6.
The StarLogo procedure shown below from the students' project shows how to set up the lights for the two traffic lights (turtles numbered 0 through 5) and how to set up and move some of the horizontal cars which are turtles numbered starting at 6.
to turtle-light
if who = 0 [setxy -16 3 setc red]
if who = 1 [setxy -19 3 setc yellow]
if who = 2 [setxy -22 3 setc green]
if who = 3 [setxy 9 -22 setc red]
if who = 4 [setxy 9 -25 setc yellow]
if who = 5 [setxy 9 -28 setc green]
end
to horizontal-cars
if who > 5 and who < numcarshorizontal + 6
[setycor -13]
if who > 5 and who < numcarshorizontal + 6
[setxcor random -50]
if who > 5 and who < numcarshorizontal + 6
[seth 90]
if who > 5 and who < numcarshorizontal + 6
[loop [fd 1] ]
end
In the third week, students create a StarLogo project of their choice, and put a description of the project complete with snapshots of it in their web portfolio. We show three such projects here. The first project shows populations of birds, fish, turtles, flies and water-bugs, each animal is represented by a square and each species is shown with a different color. Slider controls allow the user to set the initial number of each species when the simulation starts. Each species has rules for its reproduction rates and what it eats. Figure 10 shows the pond when the populations of fish and turtles is high and birds is low. Figure 11 shows the simulation much later after the kill-bugs button has been pressed and the other populations are dwindling to zero.
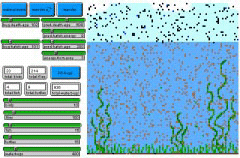
Figure 10. StarLogo Pond Lots of Life.
![]() Starlogo Pond animation.
Starlogo Pond animation.
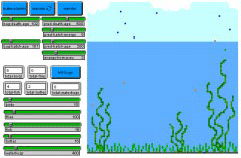
Figure 11. StarLogo Pond Life Dying.
The second project shows how three types of wildflowers can spread over a hillside. Each type is represented by a different color. When black bees land on a flower, they pick up a seed and drop the seed two random spaces away. If the space is grass, then the seed becomes a flower. Figure 12 shows the initial setup with just a few scattered flowers. Figure 13 shows the hill several cycles later including the black bees and the patches that are beginning to develop. Figure 14 shows the hill after many cycles in which there are many patches of wildflowers.

Figure 12. StarLogo Wildflowers Initially.
![]() Starlogo Wildflowers animation.
Starlogo Wildflowers animation.

Figure 13. StarLogo Wildflowers Spreading.
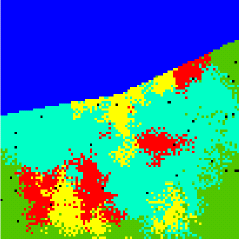
Figure 14. StarLogo Wildflowers Spreading More.
The third project shows how some order can be forced on the turtles, showing a soccer game in which the turtles are soccer players and the ball. Figure 15 shows the initial setup with the players from the two teams lined up and ready to go onto the soccer field. A line up button moves the players to their starting positions on the field. Several play buttons show different plays of the game. The black cross at the top left corner is the score board. Figure 16 shows a play in process. At the end of the game the winning team runs around the field celebrating. Other projects created include bunnies eating grass, fish and waves in water, an ant navigating in a maze, fireworks, the game of pong, a swim meet, and feeding fish in a bowl. The last day of the unit is spent presenting projects.

Figure 15. StarLogo Soccer Line Up.
![]() Starlogo Soccer animation.
Starlogo Soccer animation.
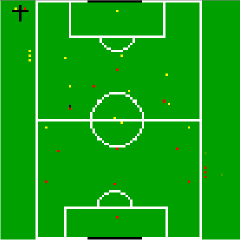
Figure 16. StarLogo Soccer Play.
3.8 Programming:
Alice
Alice [1, 7, 8] is a 3D interactive graphics programming environment created
by the Stage 3 Research Group at Carnegie Mellon University. Using Alice, novices
can easily create a 3D world using 3D objects that can be selected and controlled.
Many objects have multiple parts that can be controlled individually. We spend
one and a half weeks on Alice, plus another day for demos.
The first day of Alice is spent going through the Alice tutorial provided with the tool. Then one week is spent on creating an Alice world with specific requirements: a flying logo, coordinated movement, interactive action, making a 3D object using Teddy and including the new object in the world. After completing the world, students put it on a web page with a description of how to interact with the world.
We show three of the student projects from the course. Figure 17 shows a student project in which a girl is having a snack. When the world starts, the girl is not there. Clicking on the chair makes the girl come in and sit down in the chair. Clicking on the plate makes the girl reach over and eat some food from the plate. This can be repeated several times, each time she eats a different item on the plate. Clicking on the book makes the girl open the book and look at it. Clicking on the book again makes the girl close the book. The food on the plate is the object that was created by the student. The girl is an object that comes with the tool Alice.
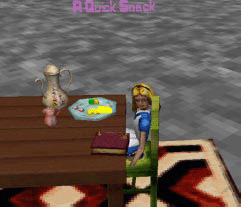
Figure 17. Girl Eating A Snack.
![]() Alice animation.
Alice animation.
Figure 18 shows a student project of a girl and a soldier dancing. The animation starts with the girl and soldier standing beside each other. The soldier walks over to the music player and turns on the music. Then he walks over to the girl and they put their arms around each other ready to dance. Clicking on the couple makes them dance.
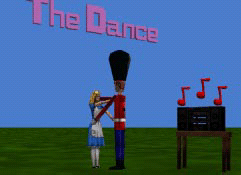
Figure 19 shows a student project of riddles that are acted out. There are a series of questions and answers shown and the answers are acted out. Clicking on each text line makes the animation continue. Additional Alice projects created included a horse eating an apple that falls from a tree, a girl bowling, a wedding, and animal races.
Figure 19. Riddles.
![]() Alice animation.
Alice animation.
3.9 Noncomputer
Activity: Being a Robot
One day is spent on learning how to be a Robot [12] in preparation for our next
unit. In this non-computer exercise, students learn how complex it is for robots
to complete a task. Groups of four students act out a robot and try to build
a specific object out of blocks.
One person is the "head", one person is the "eyes", one person is the "left hand" and one person is the "right hand." The head is blindfolded and is the only person who knows what to build. The eyes is the only person not blindfolded, cannot touch the blocks, and answer questions asked by the head. The hands are blindfolded, can move the blocks and cannot speak. The person who is a hand can only use one of his or her hands.
For this activity you will need a block set that has enough duplicate pieces for each group and the instructor to build the same structure. The instructor gives each group the pieces they will need, then builds the structure somewhere in the room where students cannot see it. The head of each group is taken over to the structure and shown what the team is to build, then returns to the group and is blindfolded. The head then gives instructions to the hands (also blindfolded) to build the object. The head can ask the eyes questions and the eyes can give simple responses. We do this activity several times, so each person can play each part of the robot. We start with simple structures and then progress to more difficult structures. Figure 20 shows a complex structure in which two hands must work together. The short blue rectangle hanging over the edge will not stay until the arch piece is put on top of it. We recommend using soft blocks; they do not make as much noise when they fall.
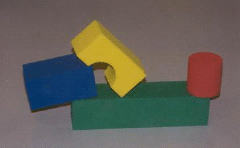
Figure 20. Be a Robot Block Structure.
3.10 Programming:
Karel++
In this final unit, five weeks are spent using Karel++ [3], a tool for programming
robots who move graphically in 2D worlds. Users control one or more robots in
a city by specifying their direction (north, south, east or west) through streets
and around barriers, picking up and putting down beepers. Karel++ is a nice
way to finish the course, with a substantial but gentle programming component.
Many others have used some form of Karel the Robot to introduce programming
in high school, in CS 0, and as an introduction in CS 1 [2, 4].
In CPS 49S, students start with a tutorial that is available on the Karel++ web site, and then class periods consist of writing programs on the following topics: creating new types of robots, modifying inherited instructions, conditional instructions, nested conditionals, looping structures, solving a maze, and recursion.
We show two examples that use Karel. In an early assignment, students guide a robot to pick up beepers that appear on the corners of a building as shown in Figure 21 and move the beepers to the middle of the sides of the building as shown in Figure 22. The program consists of moving Karel around the building while picking up beepers and placing them in the correct place. In a later assignment, after learning about creating new robots who inherit instructions, students create four robots, some who are private helpers, to move beepers (shown as circles) in Figure 23 from the pattern on the left to the pattern on the right.
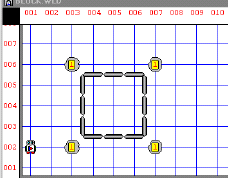
Figure 21. Initial Beeper Positions.
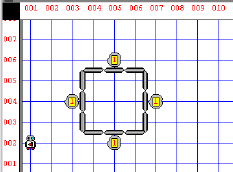
Figure 22. Final Beeper Positions.
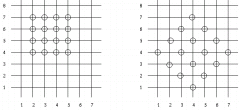
Figure 23. Moving Beepers in Karel.
4. Evaluation
In this section we describe the results of three evaluations given on the dynamics
and topics of the course.
Several questions ask about working with partners. The majority of students like working with partners, stating that two partners result in better ideas. For those that did not like working with partners, the main complaints are that the partner typing learns more, and sometimes one partner does more work. Part of the problem here is that we assign people in pairs but do not teach them how to work together.
We describe the topics in the course and their favorability. For the web page unit, 100% of the class love creating web pages and they especially like creating a web portfolio.
For the JAWAA unit, only about 50% of the class report that they like this unit. JAWAA is designed for programmers and is easier to generate animations as output from a program than typing commands in a file. The students found it a bit tedious to calculate the placement of objects and to generate a lot of commands for movement.
For the StarLogo unit, 75% of the class report that they like this unit. For those that did not, they complain about having bugs in their program that are difficult to track down. Students demo StarLogo projects during class and many have clearly put a lot of time into their programs. The tutorials for this unit are not as good as some of the other units.
For the Alice unit, this is clearly the favorite in the class with 100% of the students reporting they like this unit. The Alice interface is the easiest to use, its tutorial is the clearest of all the units and its programming is interactive. In Alice one programs by clicking with a mouse, whereas in StarLogo and Karel++ the student must type the code making it more likely to make a syntax error.
For the Karel++ unit, 75% of the class report that they like this unit. Some students thought it started off at the right pace but at some point it got too complex. The feedback on the final evaluation from the course is very positive, with students giving the course high ranks. Five of the fifteen students took Duke's CS 1 course the following semester.
5. Conclusions and Changes For The
Future
Our course on Animation
and Virtual Worlds exposes the novice to some computer science concepts using
fun programming environments. Students learn about sorting, algorithms, modeling,
simple programming constructs, inheritance, and recursion, all while learning
how to write web pages and create animations. Students work in pairs during
class with support from the instructor and teaching assistants.
We plan to offer the course again in Fall 2002 with the following changes. First there are two new noncomputer activities described in the paper that will be implemented in the fall of 2002. The pairing activity described in Section 3.1 in addition to a short talk about pair programming will be done the first day to show how to work together and the importance of working with someone. The decentralized systems activities in Section 3.6 will be added before the StarLogo unit. Many students have difficulty with the concept of many turtles executing on their own.
Since this course was offered, JAWAA has been updated to include a graphical editor that can be used by novices to interactively generate an animation instead of typing JAWAA commands in a file. Using this editor would alleviate many of the frustrations students had with this tool. We plan to get students to use both by using the JAWAA editor to create and setup the placement of all their figures and then use JAWAA to move the figures around.
Also since the course was offered, StarLogo has been updated to allow one to run their StarLogo projects on the web. In the spring of 2001, students were not able to run StarLogo projects on the web, so instead they put three pictures and a writeup of each project on their web page. Next time we would put the StarLogo projects on the web page. In addition, we plan to use some of the challenges from the new StarLogo textbook [14]. The unit on StarLogo needs to be broken up into smaller pieces so they learn a few concepts at a time.
Alice is by far the most popular tool we used, but the less like programming with its interactive interface. A new version of Alice is out and a new textbook is in preparation that uses Alice to teach CS 1 concepts. We plan to use some of the materials from this textbook and make Alice a longer unit.
We spend the most amount of time with Karel++ and students have an easy time at first with this but then have difficulty with the later chapters. In the fall of 2002 we plan to shorten this unit.
6. Acknowledgements
Thanks to Robert Duvall and Owen Astrachan for topic ideas for this course.
The work of this author
is supported by the National Science Foundation through grants NSF HRD-9979478
and
NSF DUE-9752583.
7. References
[1] Alice. http://www.alice.org/
.
[2] Becker, B. Teaching cs1 with karel the robot in java. Thirty-second SIGCSE
Technical Symposium on Computer Science Education (2001), 50-54.
[3] Bergin, J., Stehlik, M., Roberts, J., and Pattis, R. Karel++ A Gentle Introduction to the Art of Object Oriented Programming. Wiley, 1997.
[4] Buck, D., and Stucki, D. Jkarelrobot: A case study in supporting levels of cognitive development in the computer science curriculum. Thirty-second SIGCSE Technical Symposium on Computer Science Education (2001), 16-20.
[5] Bullock, H., Fernald, J., McDowell, C., and Werner, L. The effects of pair-programming on performance in an introductory programming class. Thirty-third SIGCSE Technical Symposium on Computer Science Education (2002), 38-42.
[6] CPS49S. http://www.cs.duke.edu/courses/cps049s.
[7] Dann, W., Cooper, S., and Pausch, R. Making the connection: Programming with animated small world. Fifth Annual SIGCSE/SIGCUE Conference on Innovation and Technology in Computer Science Education (ITiCSE) (2000), 41-44.
[8] Dann, W., Cooper, S., and Pausch, R. Using 3-d interactive animation to provide program visualization as a gentle introduction to programming. Second Program Visualization Workshop, Hornstrup-Centret, Denmark (2002), 1-2.
[9] JAWAA. http://www.cs.duke.edu/~rodger/tools/tools.html.
[10] Pierson, W., and Rodger, S. H. Web-based animation of data structures using jawaa. Twenty-ninth SIGCSE Technical Symposium on Computer Science Education (1998), 267-271.
[11] Resnick, M. Turtles, Termites, and Traffic Jams. MIT Press, 1994.
[12] Rodger, S. H., and Walker, E. L. Activities to attract high school girls to computer science. Twenty-seventh SIGCSE Technical Symposium on Computer Science Education (1996), 373-377.
[13] StarLogo. http://education.mit.edu/starlogo.
[14] V. Colella, E. K., and Resnick, M. Adventures in Modeling - Exploring Complex, Dynamic Systems with StarLogo. Teachers College Press, 2001.
[15] Williams, L., and Kessler, R. Pair Programming: Experience the Difference, Tutorial #68. Conference on Object-Oriented Programming, Systems, Languages and Applications (OOPSLA),2001.
[16] Williams, L., and Kessler, R. Pair Programming Illuminated. Addison Wesley, 2003.
********** End of Document **********
| IMEJ multimedia team member assigned to this paper | Yue-Ling Wong |